

🎙️ Podcast
📺 Video
📑 Slides


📝 Deep Dive
Stop Treating Your .claude Folder Like a Black Box: 5 Game-Changing Secrets for Claude Code
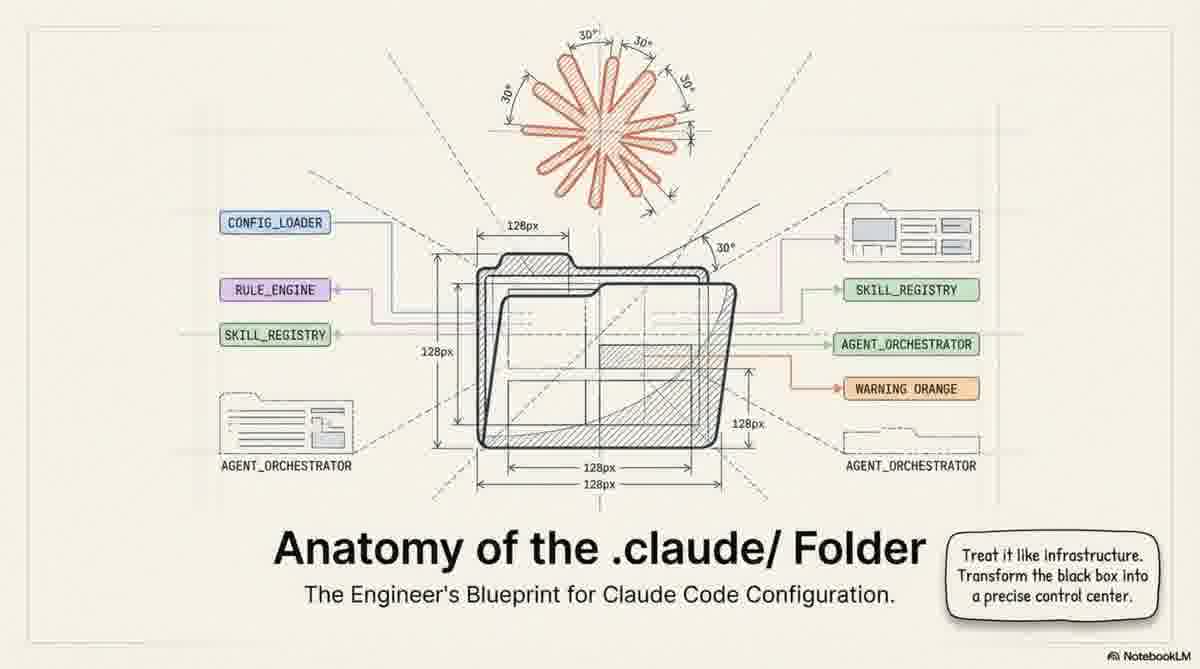
1. Introduction: The "Invisible" Control Center
Most developers treat the .claude folder like a mysterious black box. You see it appear in your project root, you know it belongs to Claude Code, but you likely never open it. By ignoring this folder, you’re missing out on the most powerful feature of the tool: the ability to move beyond manual prompting and start building AI infrastructure.
The .claude folder is the true control center for how Claude behaves in your environment. Mastering it is the difference between constantly repeating yourself in chat and having a seamless, automated workflow that understands your codebase as well as you do. This guide will move you from "just prompting" to architecting a system that codifies your team's unwritten rules.
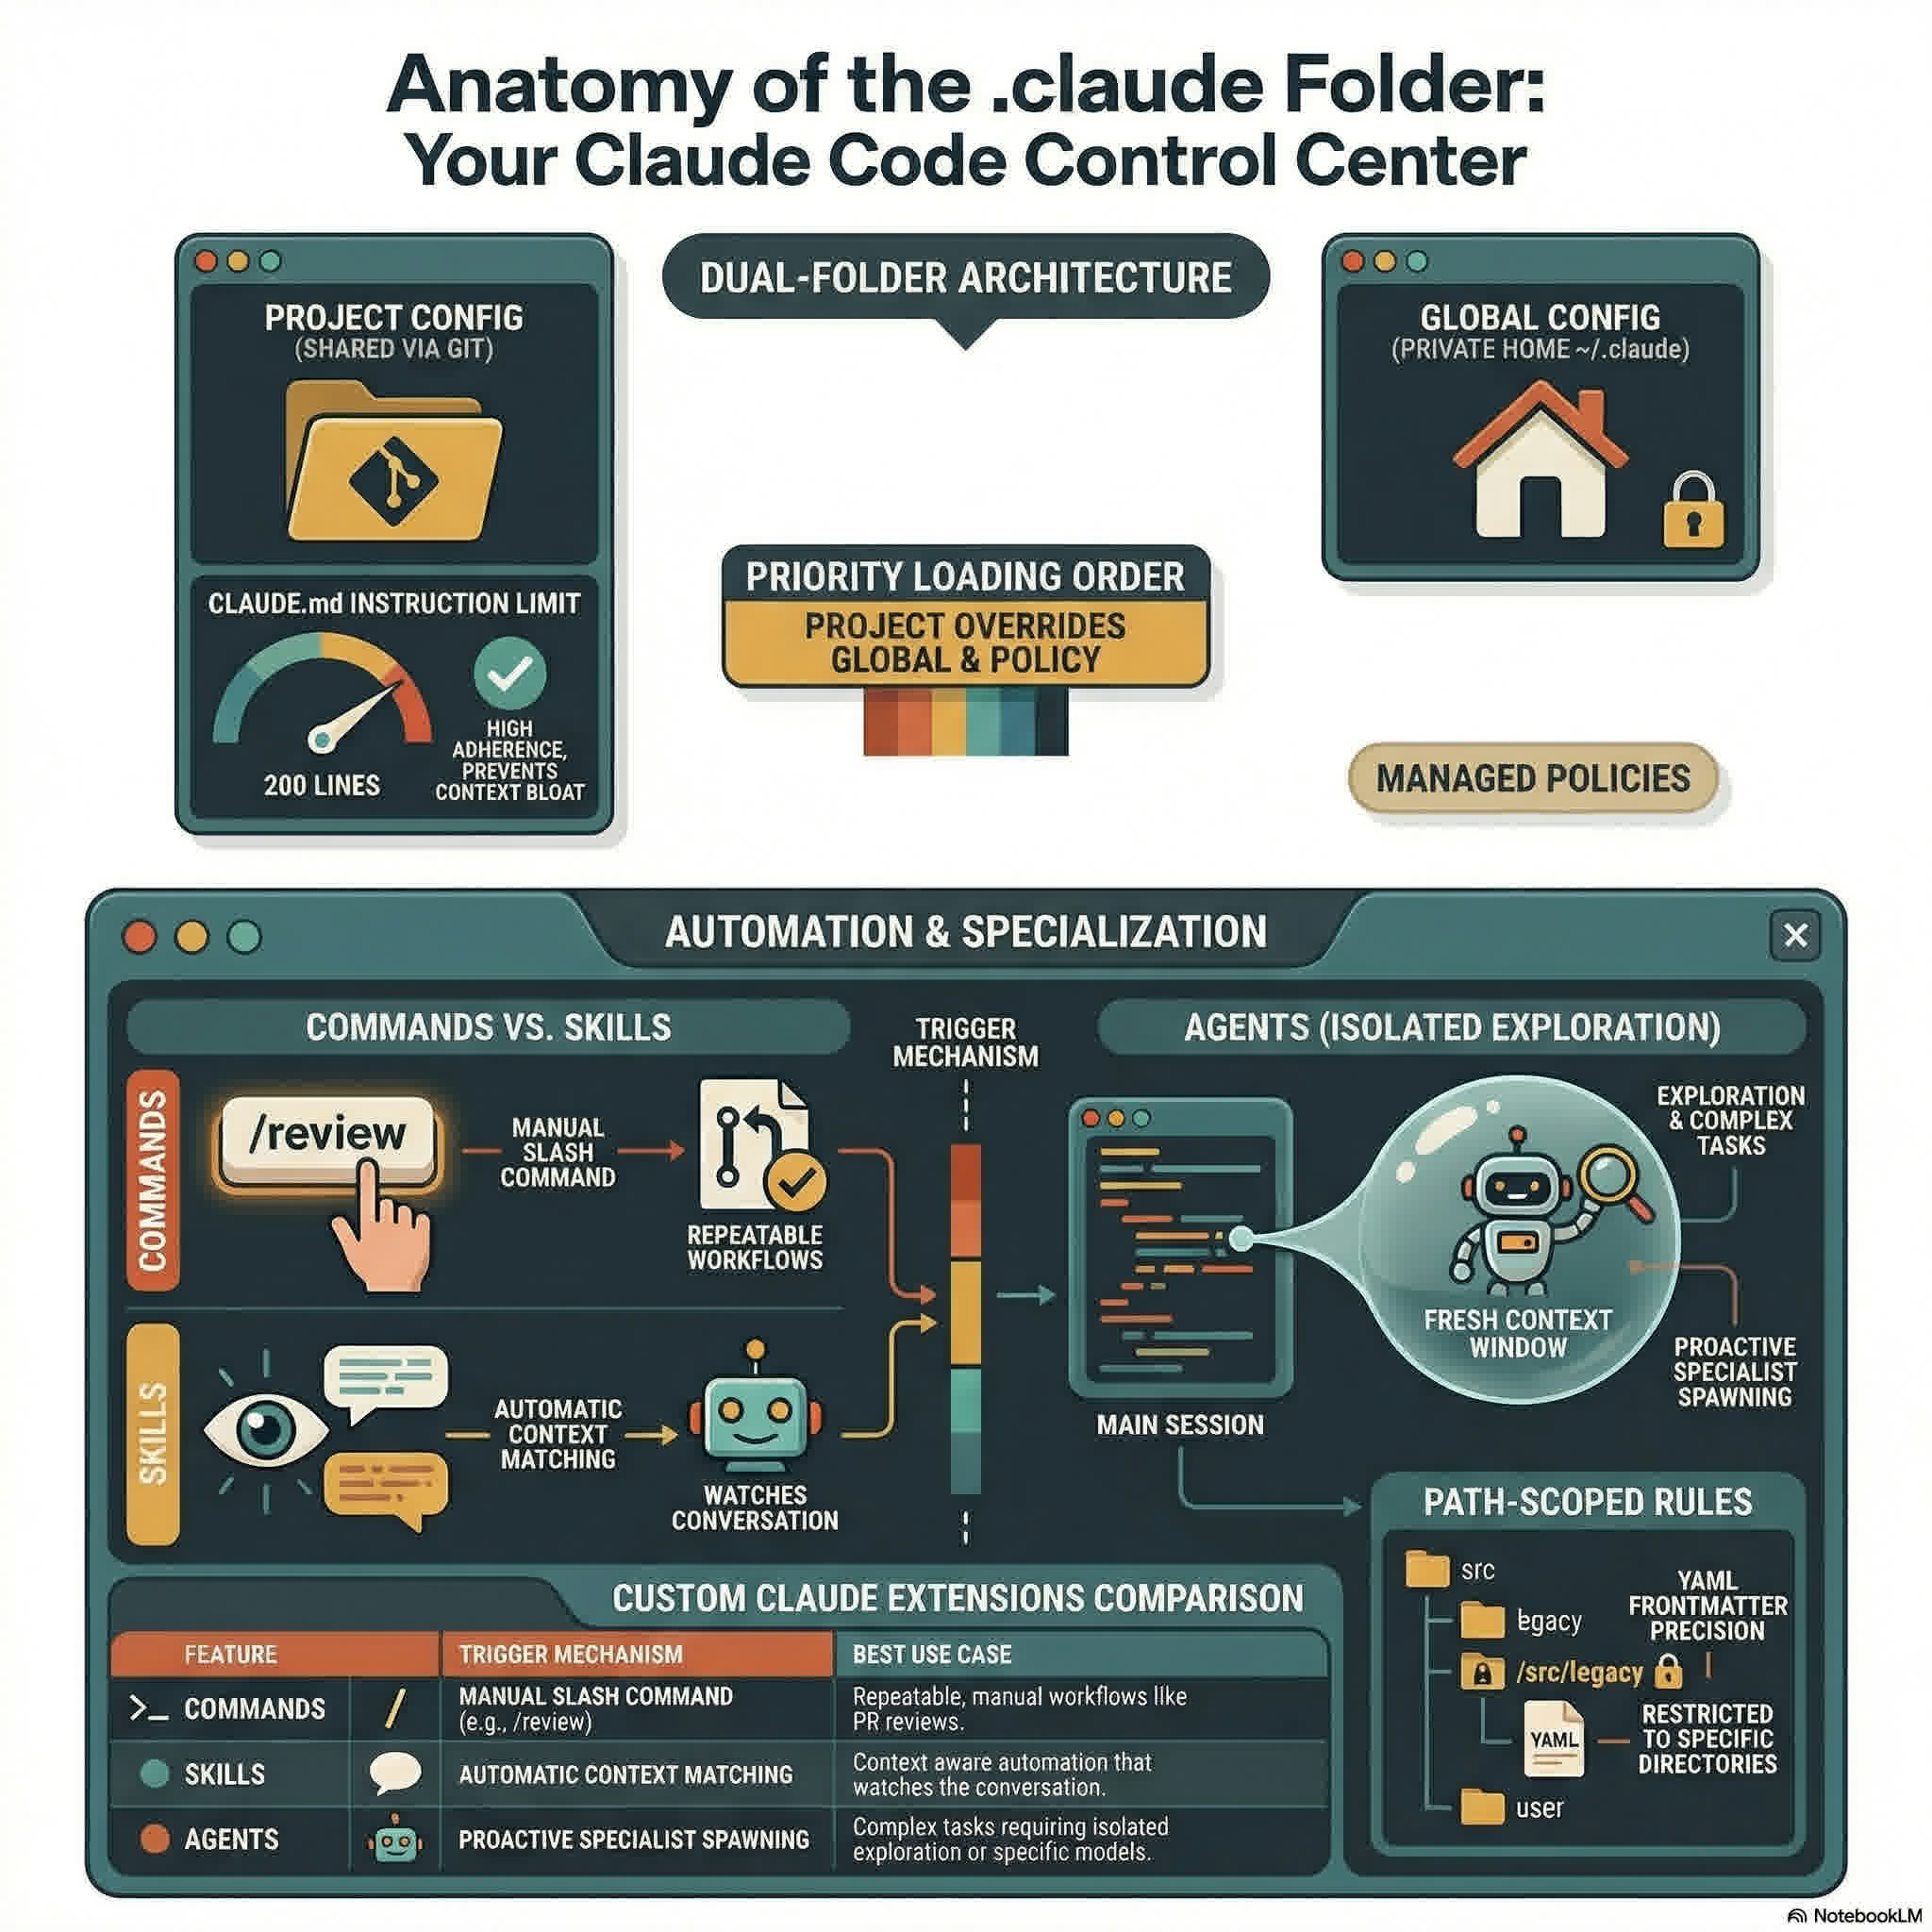
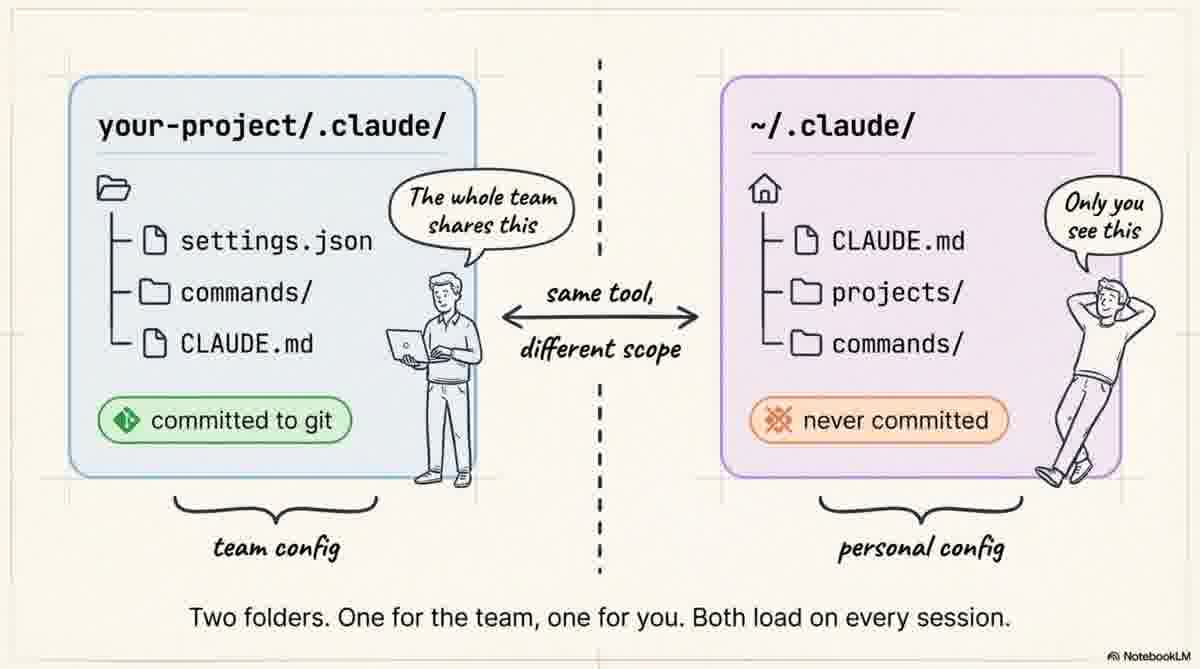
2. The Secret Dual-Life: Project vs. Global Scopes
A common mistake is thinking there’s only one .claude directory. In reality, Claude Code utilizes two distinct scopes:
- Project-Level Folder (
your-project/.claude/): This is for team configuration. It is committed to Git, ensuring every developer operates under the same rules, commands, and permissions. - Global Folder (
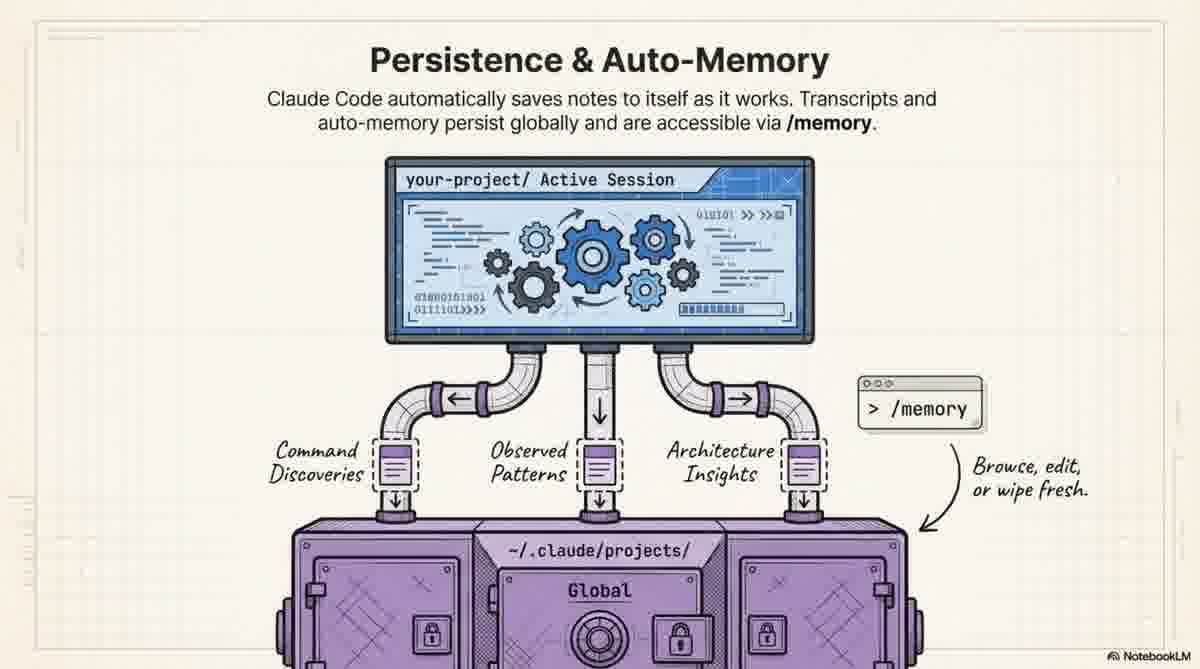
~/.claude/): This lives in your home directory and is for your eyes only. It’s never committed and houses your personal preferences, session history, and "auto-memory" that persists across projects.
This separation is vital for maintaining team standards without "stomping" on your personal developer experience. You can enforce a project-wide coding style while keeping your private session history strictly on your own machine.
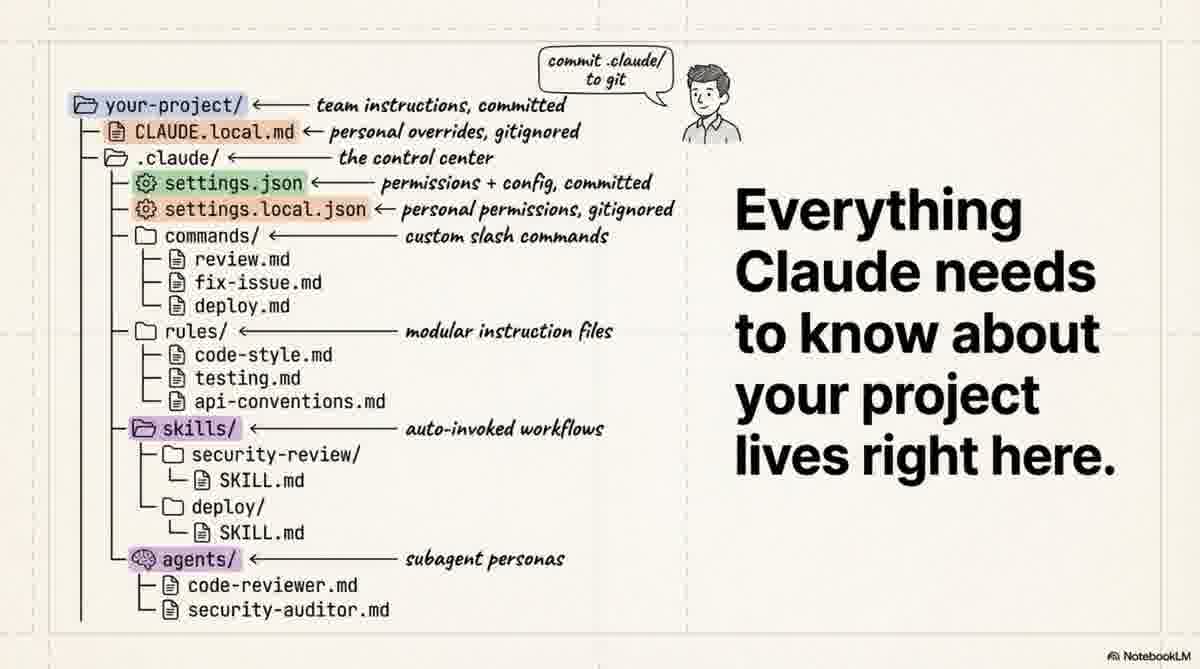
3. CLAUDE.md: The Highest-Leverage File in Your Stack
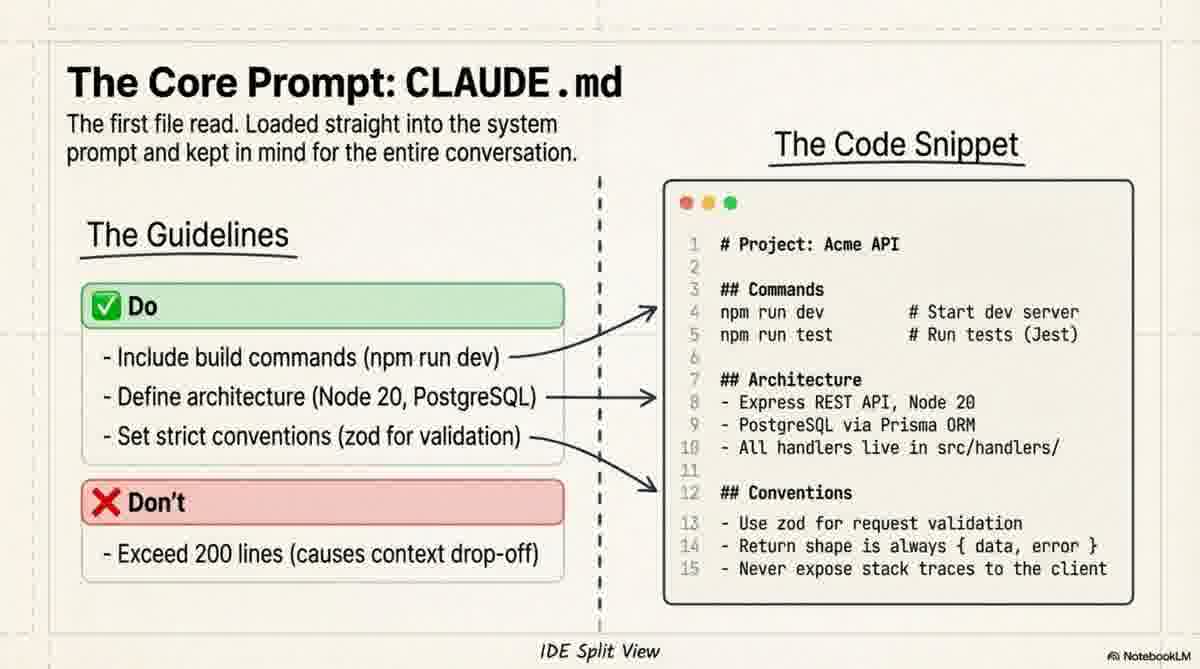
CLAUDE.md is the instruction manual for your project, loaded directly into the system prompt at the start of every session. Because it stays in Claude’s "mind" continuously, it is your highest-leverage tool for steering behavior.
The Loading Hierarchy
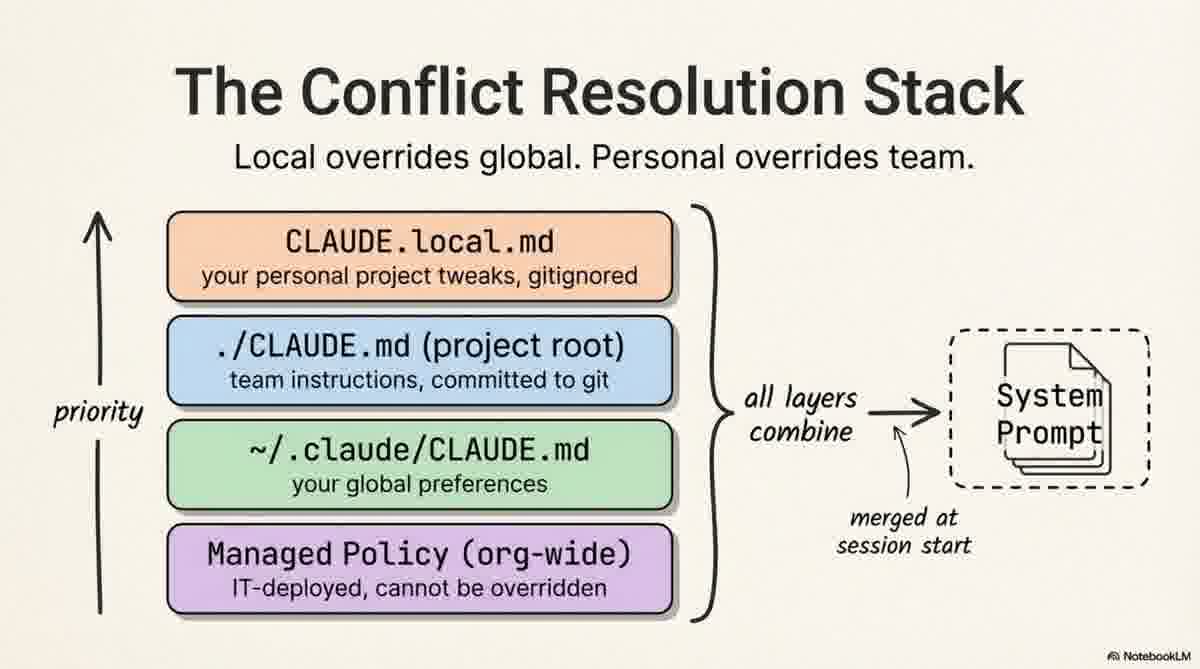
Claude combines multiple instruction layers. When conflicts occur, the priority is:
CLAUDE.local.md: Personal project tweaks (gitignored).- Subdirectory
CLAUDE.md: Rules specific to a folder (e.g.,src/api/CLAUDE.md). - Root
./CLAUDE.md: The shared team instructions. ~/.claude/CLAUDE.md: Your global preferences across all projects.- Managed Policy: Org-wide IT rules (cannot be overridden).
The Acme API Pattern
Most people write too much. Here is a lean, 20-line example that works:
## Project: Acme API

## Commands
npm run dev          # Start dev server
npm run test         # Run tests (Jest)
npm run lint         # ESLint + Prettier check

## Architecture
- Express REST API, Node 20
- PostgreSQL via Prisma ORM
- All handlers live in src/handlers/

## Conventions
- Use zod for request validation in every handler
- Return shape is always { data, error }
- Use the logger module, not console.log

## Watch out for
- Tests use a real local DB; run `npm run db:test:reset` first
- Strict TypeScript: no unused imports, ever
"Keep CLAUDE.md under 200 lines. Files longer than that start eating too much context, and Claude's instruction adherence actually drops."
Scaling with .claude/rules/
As your project grows, don't bloat your CLAUDE.md. Instead, use the rules/ directory to create modular markdown files. You can even use path-scoped rules with YAML frontmatter to trigger instructions only for specific files:
---
paths:
  - "src/api/**/*.ts"
  - "src/handlers/**/*.ts"
---
## API Design Rules
- All handlers return { data, error } shape
- Use zod for request body validation
4. Commands vs. Skills: Manual Triggers vs. Autopilot
Custom Slash Commands (.claude/commands/)
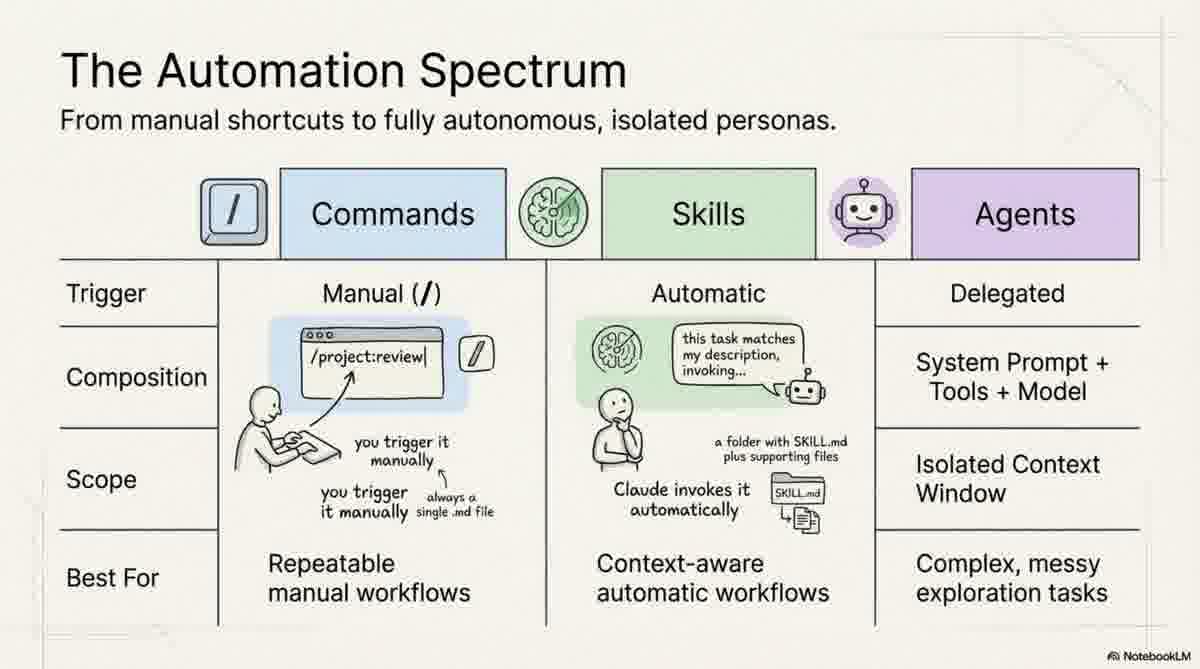
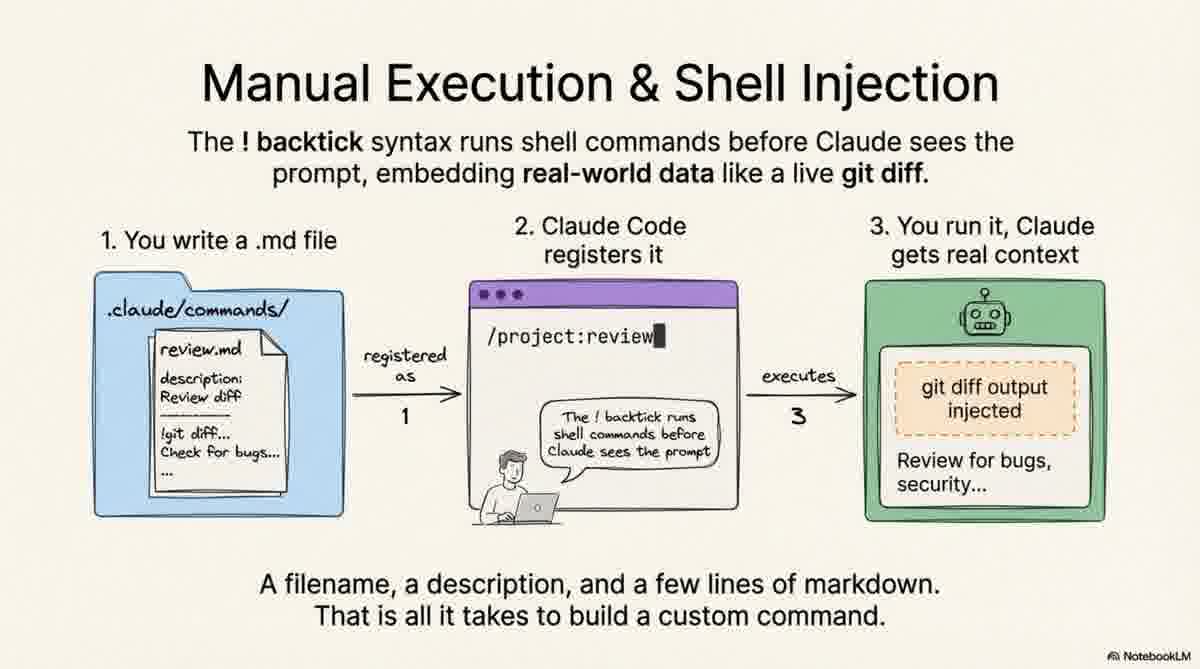
Commands "wait for you." They are single .md files where the filename becomes the command (e.g., review.md becomes /project:review).
You can use the ! backtick syntax to run shell commands and inject the output, and $ARGUMENTS to pass variables:
---
description: Investigate and fix a GitHub issue
argument-hint: [issue-number]
---
Look at issue #$ARGUMENTS in this repo.
!`gh issue view $ARGUMENTS`
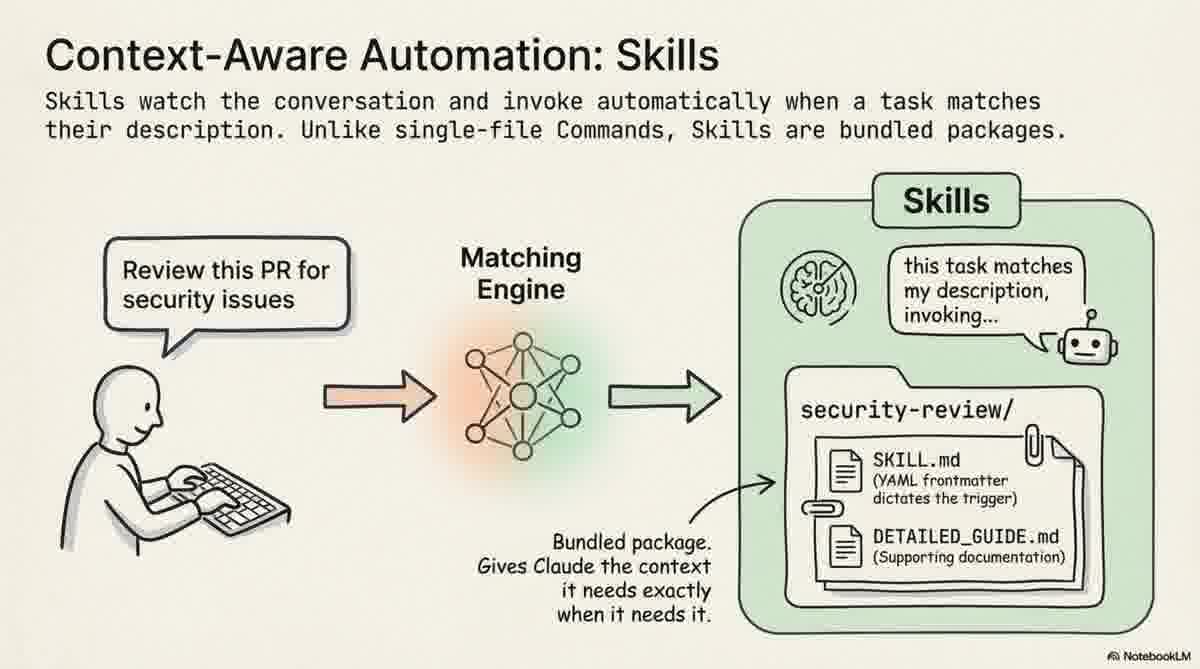
Auto-Invoked Skills (.claude/skills/)
Skills "watch for the right moment." These are context-aware workflows Claude invokes automatically when a task matches the skill's description. Technical Requirement: Unlike commands (single files), a skill is a subdirectory containing a SKILL.md file and any supporting templates or guides.
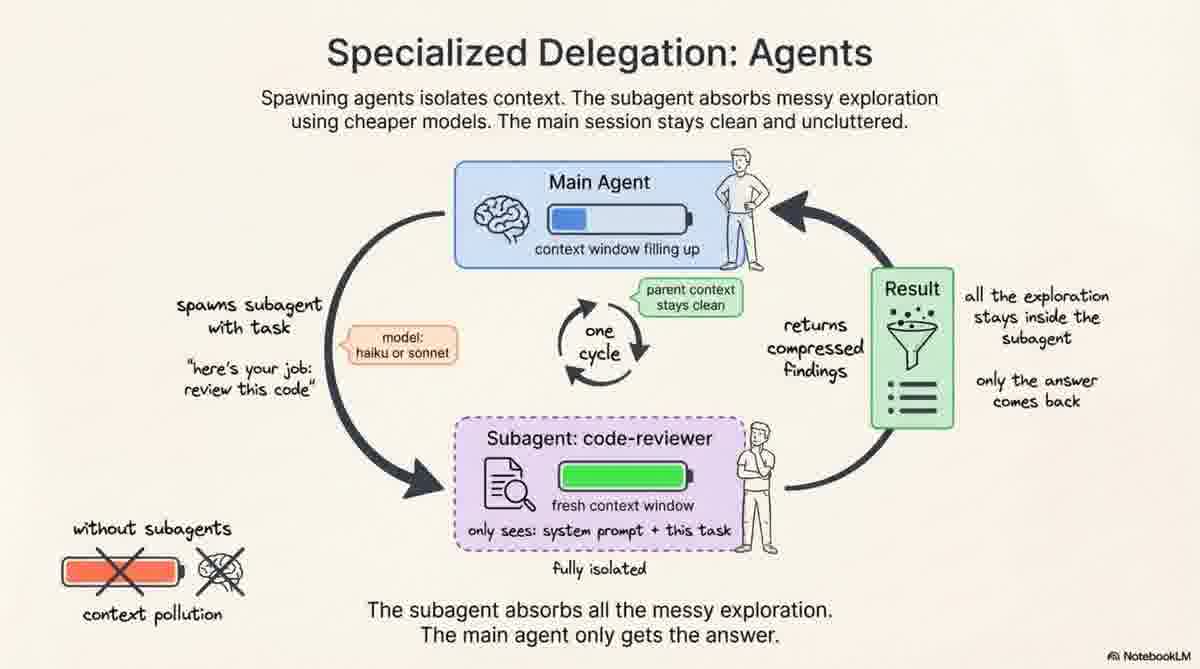
5. Sub-Agents: Solving the "Context Pollution" Problem
Complex tasks lead to "context pollution"—intermediate exploration cluttering the main session. Specialized sub-agent personas defined in .claude/agents/ solve this.
When triggered, a sub-agent operates in an isolated context window. It performs the messy exploration and returns only a compressed final answer to the main session. You can optimize these agents via frontmatter:
model:: Use a faster model likehaikufor read-only exploration to save costs.tools:: Restrict permissions (e.g.,tools: Read, Grep) so a security-auditor agent can't accidentally write code.
6. The Safety Net: Lockdowns with settings.json
The settings.json file is your permission layer. Always include the $schema line for autocomplete and validation:
{
  "$schema": "https://json.schemastore.org/claude-code-settings.json",
  "permissions": {
    "allow": ["Bash(npm run *)", "Read"],
    "deny": ["Bash(rm -rf *)", "Read(./.env)"]
  }
}
- Allow List: Commands that run without asking.
- Deny List: Commands or files (like
.env) that are strictly blocked. - Safety Net: Anything else forces Claude to ask for permission. Use
settings.local.jsonfor personal permission tweaks you don't want to commit.
7. Conclusion: From Prompter to Architect
By mastering the .claude folder, you transform Claude from a chatbot into a piece of project infrastructure. You are no longer just prompting; you are architecting a system that knows your team's "unwritten rules."
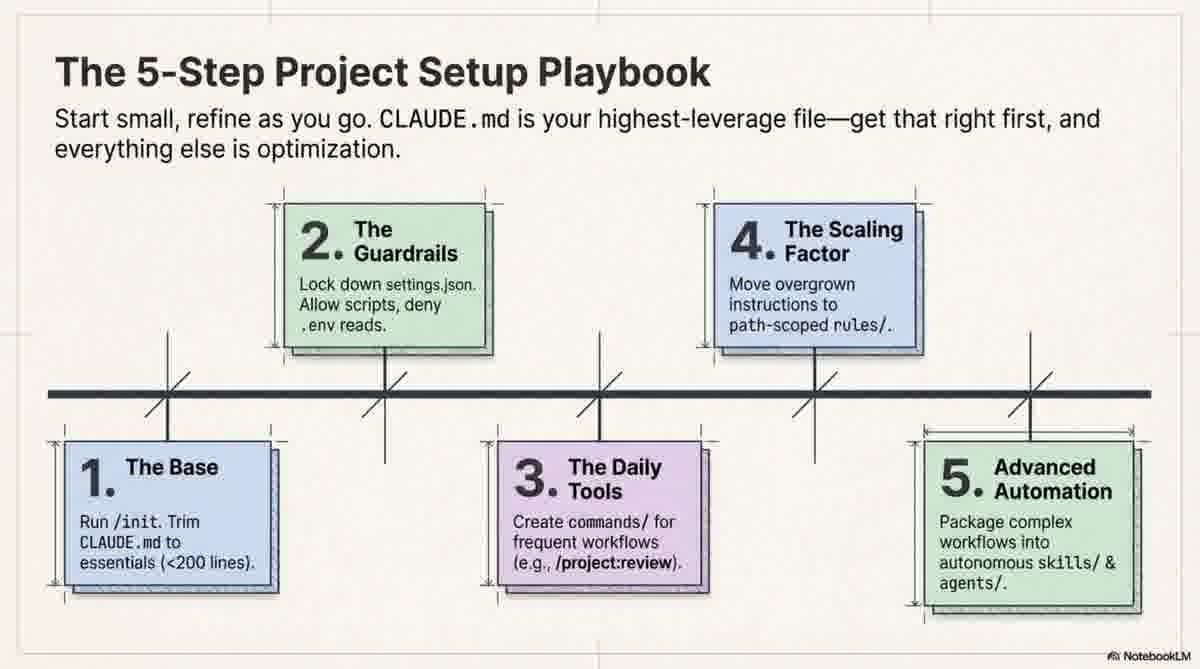
Pro-Tip: The 5-Step Implementation Path
/init: Run this to generate a starterCLAUDE.md.settings.json: Define your allow/deny rules immediately.- Commands: Create one for your most frequent workflow (like
/project:review). - Rules: As
CLAUDE.mdhits the 200-line limit, migrate instructions to path-scoped files inrules/. - Global Prefs: Add your personal coding philosophy to
~/.claude/CLAUDE.md.
Treat your .claude folder like infrastructure, and it will pay dividends every day.
📄 Briefing Doc: Technical Analysis
📋 Technical Specifications & Detailed Analysis
Anatomy and Configuration of the Claude Code Framework
Executive Summary
The .claude/ folder serves as the central control hub for "Claude Code," transitioning the AI from a general-purpose model into a project-specific infrastructure tool. This framework relies on a dual-directory architecture: a project-level folder for shared team configurations and a global home-directory folder for personal preferences and session history.
The core of this system is CLAUDE.md, which functions as a persistent instruction manual injected into the system prompt. Beyond basic instructions, the framework provides sophisticated tools for automation and governance, including:
- Modular Rules: Path-scoped instructions for specific codebase areas.
- Custom Commands and Skills: Manual and automatic workflows that integrate with shell outputs.
- Subagents: Specialized personas that execute complex tasks in isolated context windows to prevent "context pollution."
- Permission Governance: A strict
settings.jsonschema to define allowed and denied operations (e.g., file access or shell commands).
Proper implementation follows a maturity curve: starting with a concise CLAUDE.md, establishing security boundaries in settings.json, and eventually modularizing instructions and automating repeatable workflows through commands and agents.
1. The Dual-Directory Architecture
The Claude Code environment is split between two distinct scopes to balance team collaboration with individual developer preferences.
| Feature | Project-Level (your-project/.claude/) |
Global (~/.claude/) |
|---|---|---|
| Scope | Team configuration and project-specific rules. | Personal preferences and machine-local state. |
| Persistence | Committed to Version Control (Git). | Never committed; local to the user. |
| Shared Content | settings.json, commands/, rules/, skills/. |
Session history, auto-memory, personal scripts. |
| Visibility | Shared by the entire team. | Only visible to the individual user. |
2. Instruction Management: CLAUDE.md and Rules
The Role of CLAUDE.md
CLAUDE.md is the most critical file in the framework. It is loaded directly into the system prompt at the start of every session. It serves as the primary source of truth for project architecture, naming conventions, and technical constraints.
Effective CLAUDE.md Content:
- Commands: Standard build, test, and linting scripts (e.g.,
npm run test). - Architecture: Core tech stack details (e.g., "PostgreSQL via Prisma ORM").
- Conventions: Naming patterns, error handling styles, and import rules.
- Constraints: Known "gotchas" like strict TypeScript settings or specific database requirements.
Note: It is recommended to keep this file under 200 lines to maintain high instruction adherence and avoid excessive context consumption.
Loading Order and Priority
When conflicts arise between different instruction files, the system follows a specific hierarchy. Higher-level files override lower-level ones:
- CLAUDE.local.md: Personal project tweaks (gitignored).
- ./CLAUDE.md: Team instructions at the project root (committed to Git).
- ~/.claude/CLAUDE.md: Global user preferences.
- Managed Policy: Org-wide IT-deployed rules (cannot be overridden).
Modular Rules
To prevent CLAUDE.md from becoming unmanageable, developers can use the .claude/rules/ directory. This allows for modular, concern-based instructions (e.g., testing.md, api-conventions.md).
Rules can be path-scoped using YAML frontmatter, ensuring Claude only loads specific instructions when working within matching directories:
---
paths:
  - "src/api/**/*.ts"
---
## API Design Rules
- All handlers return { data, error } shape.
3. Automation: Commands and Skills
The framework distinguishes between manually triggered actions and context-aware automations.
Custom Commands
Stored in .claude/commands/, these are markdown files that become slash commands (e.g., review.md becomes /project:review).
- Shell Integration: Commands use the
!backtick syntax to run shell commands and inject the output (e.g.,git diff) directly into the prompt. - Arguments: Commands can accept variables via
$ARGUMENTSto perform specific tasks like investigating a GitHub issue by ID.
Skills
Stored in .claude/skills/, these are workflows Claude invokes automatically when it recognizes a task matches the skill's description.
- Package Structure: Unlike single-file commands, skills are subdirectories that can include a
SKILL.mdand supporting documentation. - Triggering: Skills "watch" the conversation and act when the moment is right, whereas commands wait for user invocation.
4. Specialized Subagents
For complex tasks, Claude can spawn "Subagents" defined in .claude/agents/. This architecture provides several technical advantages:
- Context Isolation: The subagent operates in a fresh context window. It performs "messy exploration" and returns only a compressed summary of findings to the main agent.
- Model Optimization: Users can specify different models for subagents (e.g., using a faster model like Haiku for exploration and Sonnet for the main session).
- Tool Restriction: Subagents can be limited to specific tools (e.g., a "security-auditor" may be restricted to read-only tools).
5. Governance and Permissions
The settings.json file in the .claude/ folder defines the security boundary for the AI. It utilizes an allow and deny logic to manage tool execution.
- Allow List: Operations Claude can perform without asking for user confirmation (e.g.,
npm run *,git status). - Deny List: Strictly forbidden operations that Claude cannot execute under any circumstances (e.g.,
rm -rf *, reading.envfiles). - Explicit Confirmation: Any command not found in either list requires manual user approval before execution.
6. Implementation Strategy: The Five-Step Progression
To properly set up a Claude Code project, the following progression is recommended:
- Initialization: Run
/initto generate a baseCLAUDE.mdand refine it to essential project details. - Security Baseline: Configure
.claude/settings.jsonto allow standard build scripts and deny access to sensitive secrets. - Workflow Automation: Identify the most frequent manual tasks (like code reviews) and create custom commands in
.claude/commands/. - Modularization: As the project scales, move specialized instructions from the main
CLAUDE.mdinto path-scoped files within.claude/rules/. - Global Optimization: Add personal coding preferences (e.g., "prefer functional patterns") to
~/.claude/CLAUDE.mdfor a consistent experience across all local projects.
🔗 References
• Twitter/X: Claude Code Workflows by @akshay_pachaar
• Twitter/X: Claude Code Configuration by @akshay_pachaar
